Finch Overview
How Finch Works
The Finch flow begins when your customer (a business owner, HR or payroll administrator, etc) wants to connect their employment, payroll, or applicant tracking system to your application. Once your customer connects their system, you can begin to call Finch's APIs to get the data you need.
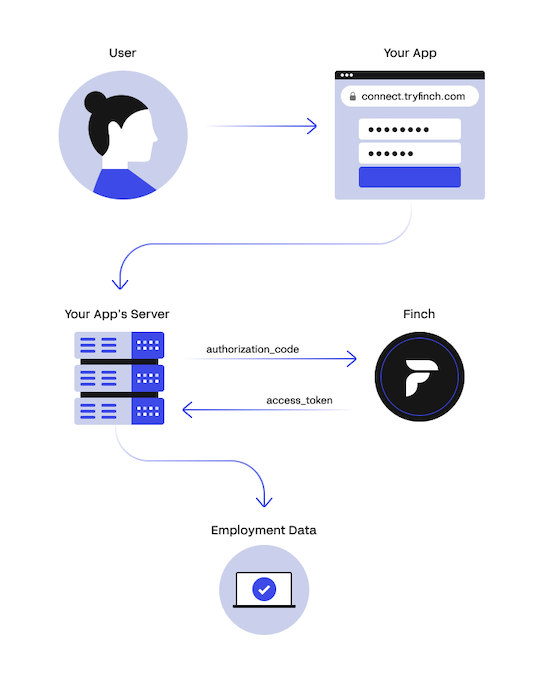
- Open Finch Connect - The first step is to open Finch Connect which is a secure and elegant authorization flow (built on OAuth 2.0) allowing your customers to grant your application access to their system. Your frontend application launches Finch Connect which initiates this authorization flow.
- Obtain Customer Consent - Finch Connect displays the permissions your application is requesting access to in their employment or payroll system. If they consent to these permissions, they are next asked to select their provider and prompted to log in to their account using a username and password or an API Key if available.
- Receive An Authorization Code - Once your customer successfully connects and grants your application access to their system, Finch Connect will provide a short-lived authorization
code. The authorizationcoderepresents your customer consenting to allow your application access to their payroll account. It does not grant access to the payroll account itself. The authorzation code expires in 10 minutes. - Exchange Code For Access Token - To interact with the Finch API, you will need to exchange the short-lived authorization code for a long-lived
access_tokenbefore it expires. A Finch access token is a long-living, infinite token, i.e. it does not expire unless explicitly disconnected. This exchange should always take place in your back-end to ensure yourclient_secretandaccess_tokenare never publicly exposed. - Call Finch APIs - Once an access token has been obtained, the token can be used to call Finch APIs directly. Finch will respond back with data formatted in our standardized data modal regardless of the provider.
Frontend + Backend
Finch requires both a frontend and a backend. The frontend application manages connecting the employer's system, and the backend server manages the requests and responses to/from Finch APIs.
Frontend User Interface
There are two ways to integrate Finch Connect into your application's frontend user interface.
- Your application can embed Finch Connect using our various SDKs. By embedding Finch Connect, it allows your customer to always remain on your application's domain during the entire connection process.
- Your application can redirect to Finch Connect from the customer's browser. Finch Connect would be securely hosted by Finch on
https://connect.tryfinch.cominstead of your application.
Backend Security
Finch requires a backend server for application security reasons.
- Since the data from payroll providers is sensitive, making API requests from the backend and storing that data on the backend reduces the likelihood of this data being exposed to malicious persons.
- The exchanging the authorization code for an access token should always take place in your backend to ensure your client_secret and access_token are never publicly exposed.
- Likewise, your backend should always store the access token in a secure database and should never return the access token to the frontend application.